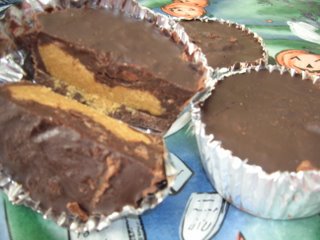
 My homemade dark chocolate peanut butter cups
Any chocoholic candy lover will most likely profess to a deep affection for peanut butter cups. In a recent post, I discussed how much I not only enjoy Reese’s cups, but also the seasonal varieties of them in their egg and pumpkin forms. I, and I’m sure many other cup lovers, have noticed that the peanut butter found inside is not the same as what comes out of the jar. Many theories have been proposed over what the difference is. Perhaps it is a special “candy” peanut butter that Reese’s makes. Maybe they add extra sugar to it and change the consistency. Well, as promised, I am about to reveal the secret to making really great homemade peanut butter cups: graham crackers. By simply adding graham cracker crumbs and a little bit of granulated sugar to that regular old peanut butter from a jar, you can achieve the same taste and consistency of the popular commercial candy. For the complete recipe:
*Place plain graham crackers inside a ziplock bag and seal it completely. Using a mallet or the bottom of a mug, crush the crackers completely until you have fine powdery-like crumbs. Add a small amount of granulated sugar to the mixture and mix it with the peanut butter in equal parts. You may warm the peanut butter slightly on low heat in the microwave to make mixing easier.
*Use metallic cupcake liners to place inside regular sized cupcake pans. Depending on your mood/taste, melt milk, white, or semi-sweet chocolate chips (or even get creative and mix different kinds together) using a double boiler method (one smaller pan inside a larger pan filled with water). This method is preferable over using a microwave as the chocolate will remain hot and melted throughout the entire process. It takes about 2 regular sized bags of chips to make 12 cups.
*Make sure the chocolate is completely melted and is a smooth liquidy consistency before starting: you can add milk and/or butter or margarine in small increments to the mixture to aid in achieving this.
*When the chocolate is the right consistency, use a tablespoon or small ladle to spoon a small amount of chocolate into the bottom of each cupcake tin. You can use a spoon to spread the chocolate to the edges so as to make a small nest in the chocolate.
*Using a teaspoon, place a small amount of peanut butter in the center of each chocolate nest, and then spoon more chocolate over them until they are completely covered. Shake the pan a few times to make sure you get the chocolate to completely cover and surround the peanut butter.
*Place the pan inside the refrigerator for a few hours to let the chocolate completely harden. When they are ready, the cups should easily slide right out of the pan and will be able to be unwrapped from the metallic liners very easily.
Admittedly, the directions are little ambiguous at times as I only recently tried this myself for the first time last week. Use your good judgement and make sure to taste test your mixtures as you go. You can even get really fancy and melt a contrasting color of chocolate and drizzle them over the tops of your cups. Make some this weekend--believe me, they’re really not hard to make at all, and you will love the delicious results!


No comments:
Post a Comment